Constructing A Route
Book Extract
These days we probably think of a route defined by a series of waypoints, places to which we wish to go in the process of getting from one place to another.
The term waypoint is relatively modern, stemming from the need to find the latitude and longitude of a point so that we could then enter it into a navigation receiver’s processor via a keyboard. When navigation was less sophisticated, we would put some lines on the chart and plot our position to endeavour to keep as close to track as possible. There was no need to extract and write down any latitude and longitude at all unless we were using a sextant.
These days we should be able to enter into the ‘navigator’ the coordinates (latitude and longitude) of any position that is on our ‘way’. These are the waypoints.
The process will differ according to the type of ‘navigator’ we are using; GPS receiver or GPS chartplotter.
Using Second-Hand Waypoints
You can buy books of waypoints. Also pilot books, almanacs and boating magazines list waypoints. I never use waypoints that I have not plotted myself, and I never join waypoints from a list to form a route, unless I have inspected the area on a recognised chart, paper or electronic. What is the point of using waypoints, the author of which states that you use them at your own peril and that they should not be used for navigation?
A Route for Use with a GPS Receiver
Here, our starting point is a paper chart on which we can draw a complete route. It may not have sufficient detail in areas where we are close to danger, but we can see the whole route on one sheet.
Choose your route so that it is as short as possible, but avoids passing too close to any possible hazard. It’s possible that you may have to adjust the route when you look at smaller scale charts where the route needs to be inspected more closely.
Do not use the actual position of navigational marks as waypoints. GPS can be so accurate that you might collide with the buoy, and if other navigators also use the same mark, you may collide with their boat. Aim 100 metres or so off.
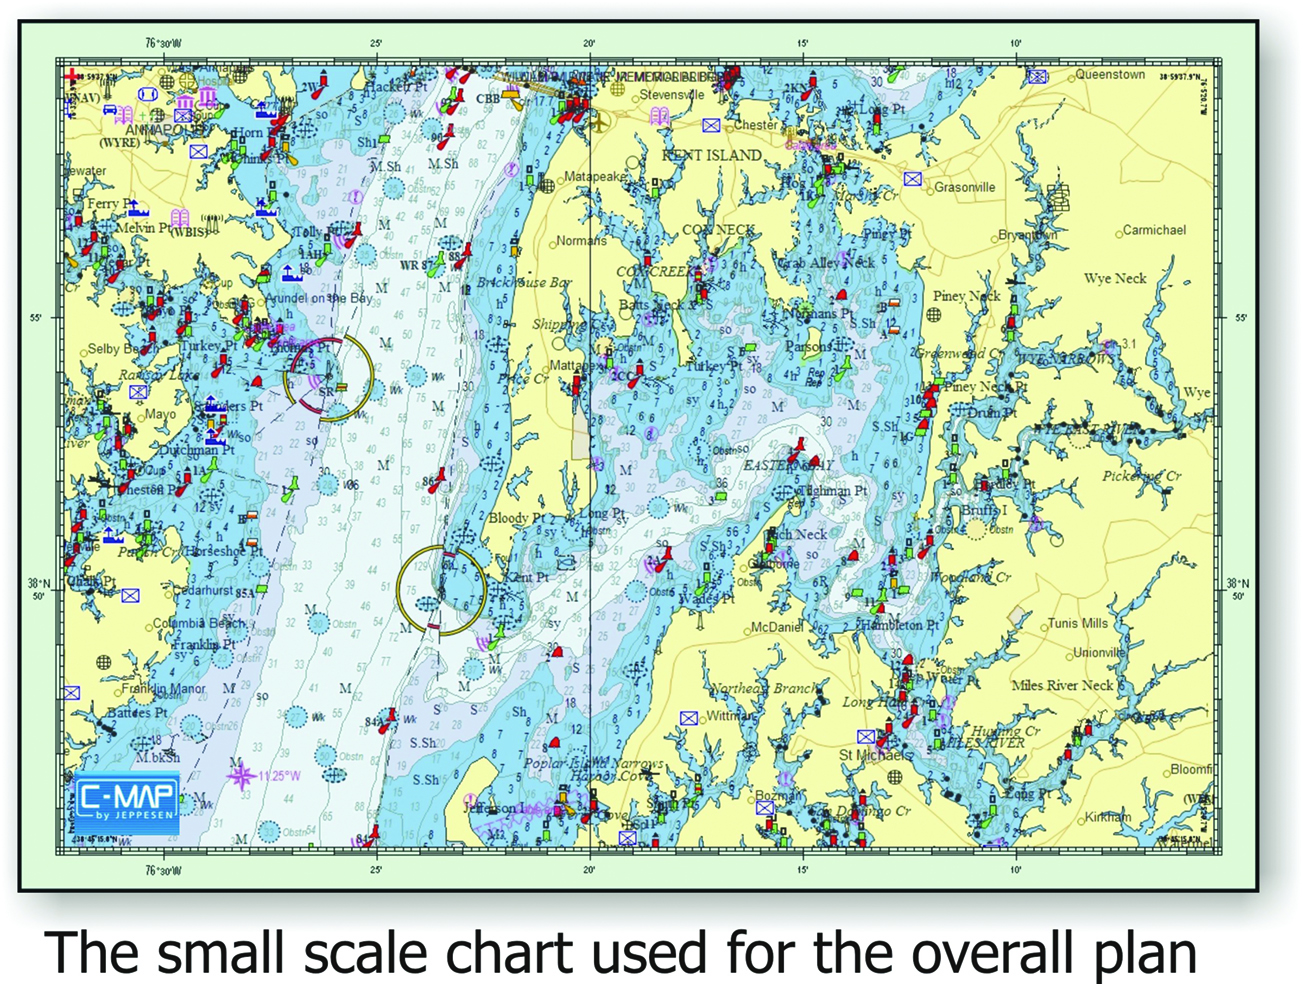
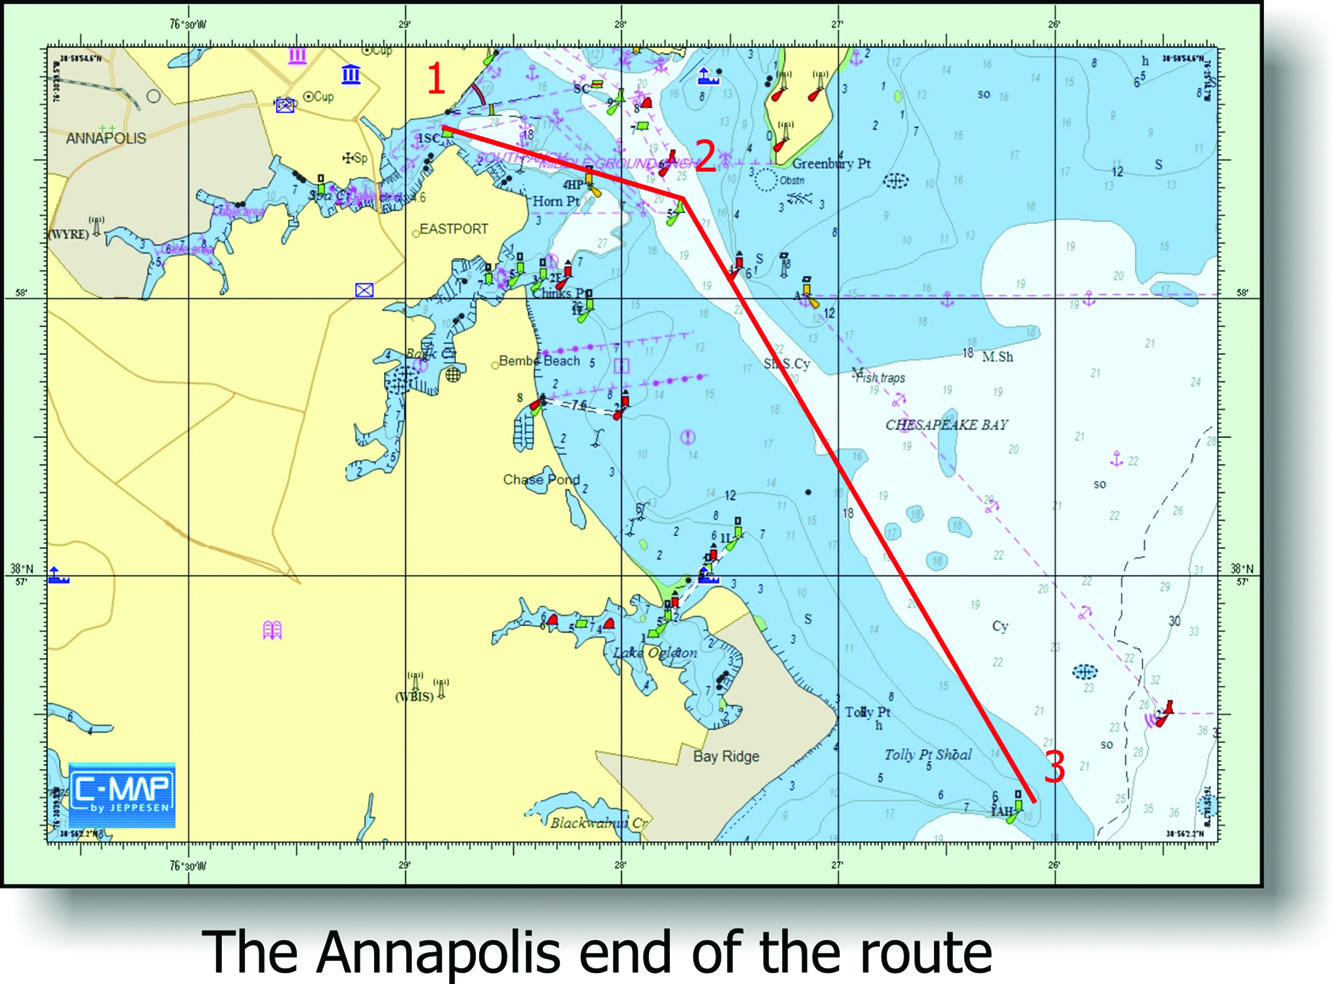
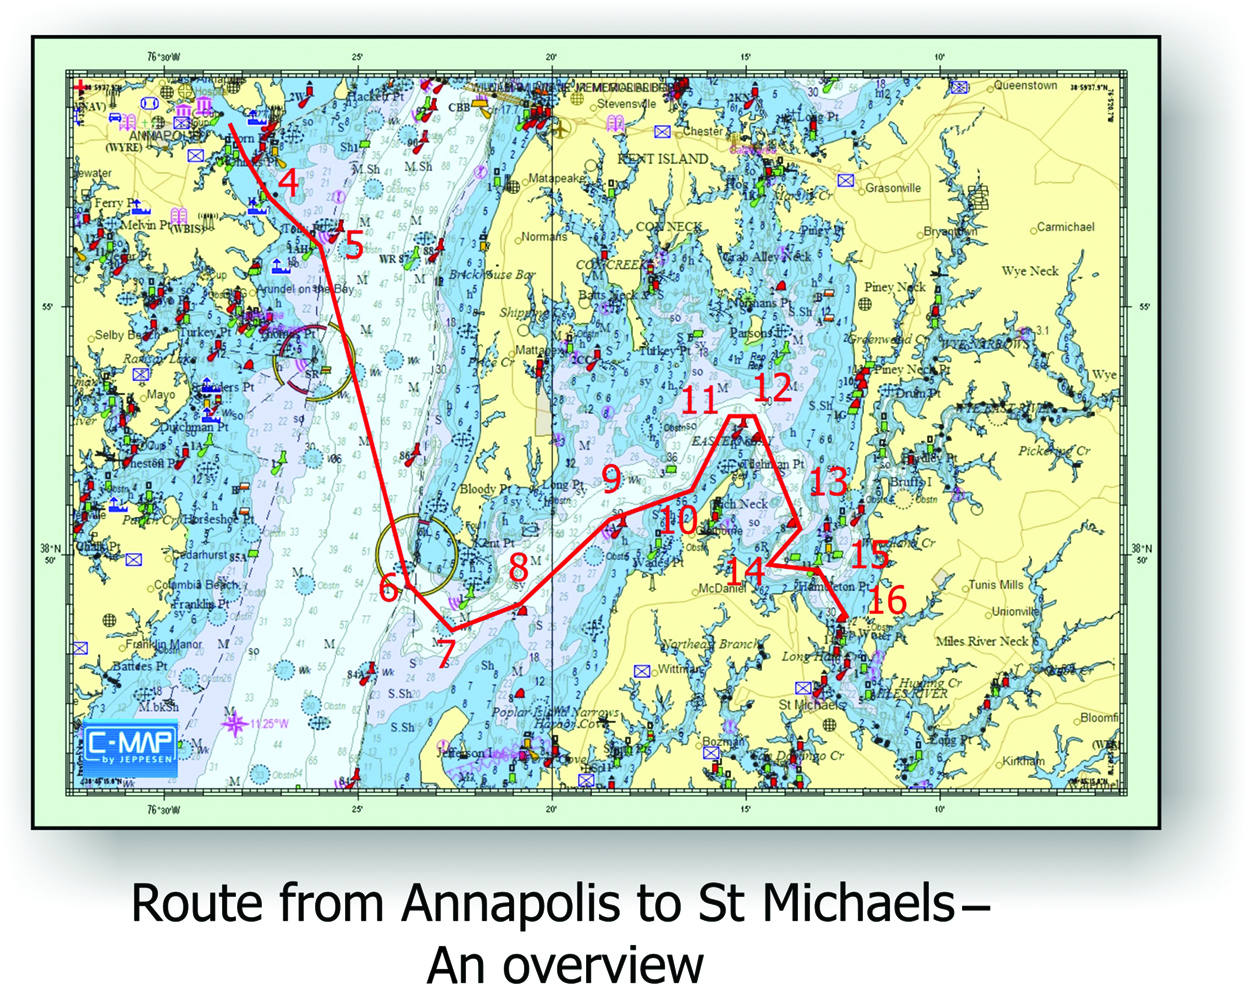
Let us construct a route from Annapolis to St Michaels in the Chesapeake. We’ll need a chart with a scale of around 1:1 25 000 for the overview and charts of a scale of around 1:2 500 for each end where we need more detail.
Starting at Annapolis we can put the first three waypoints on the large-scale chart, before moving to the small-scale chart to add the next seven waypoints.
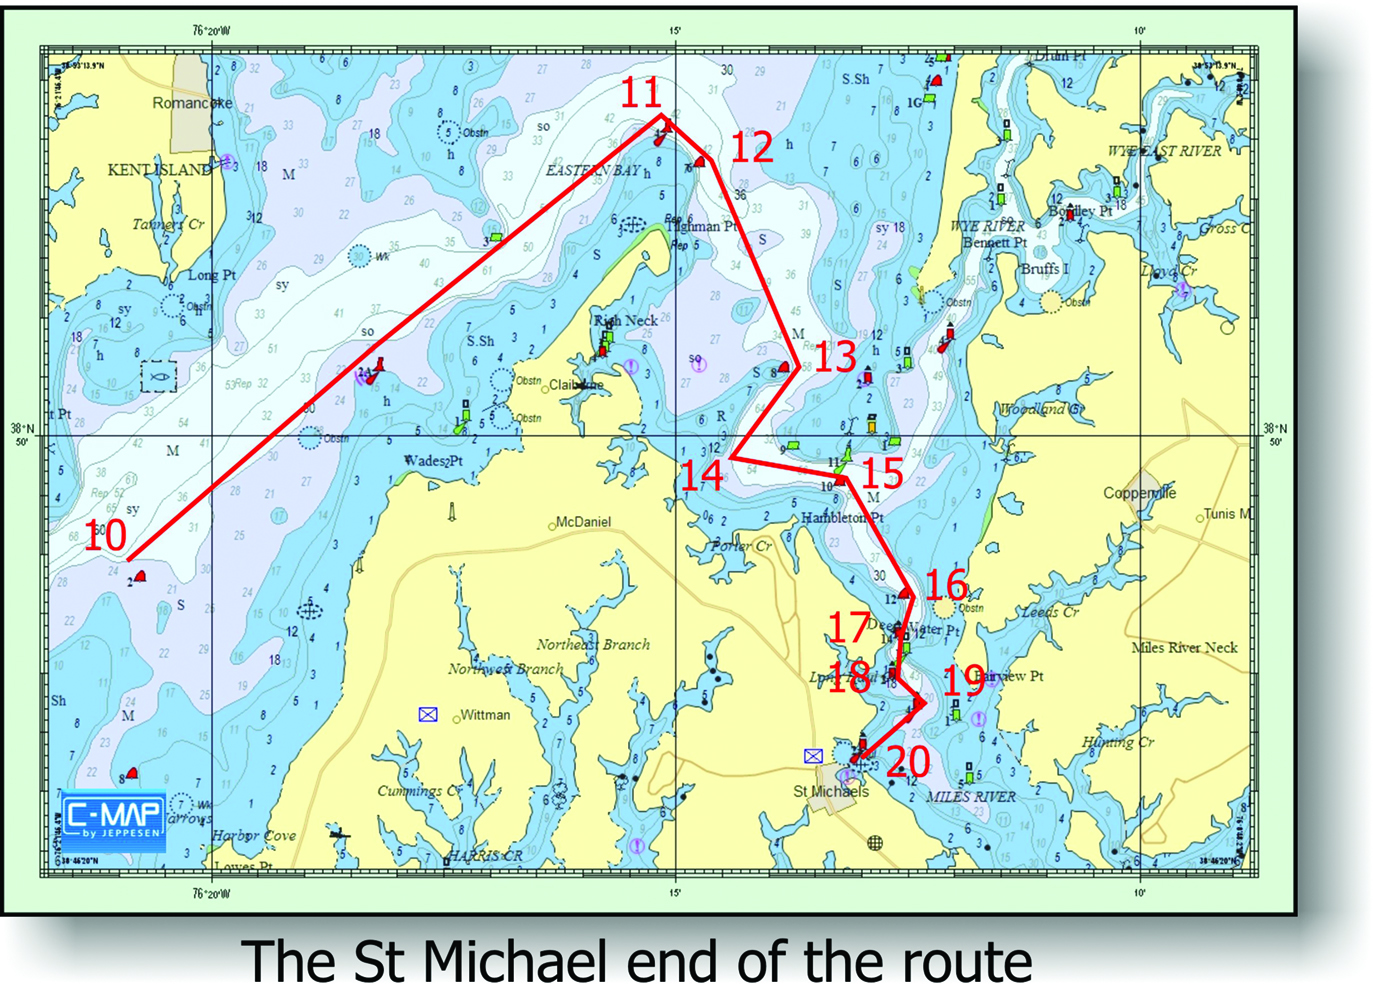
Now we’ll need to use the large-scale chart for St Michaels to put the rest of the waypoints in place.
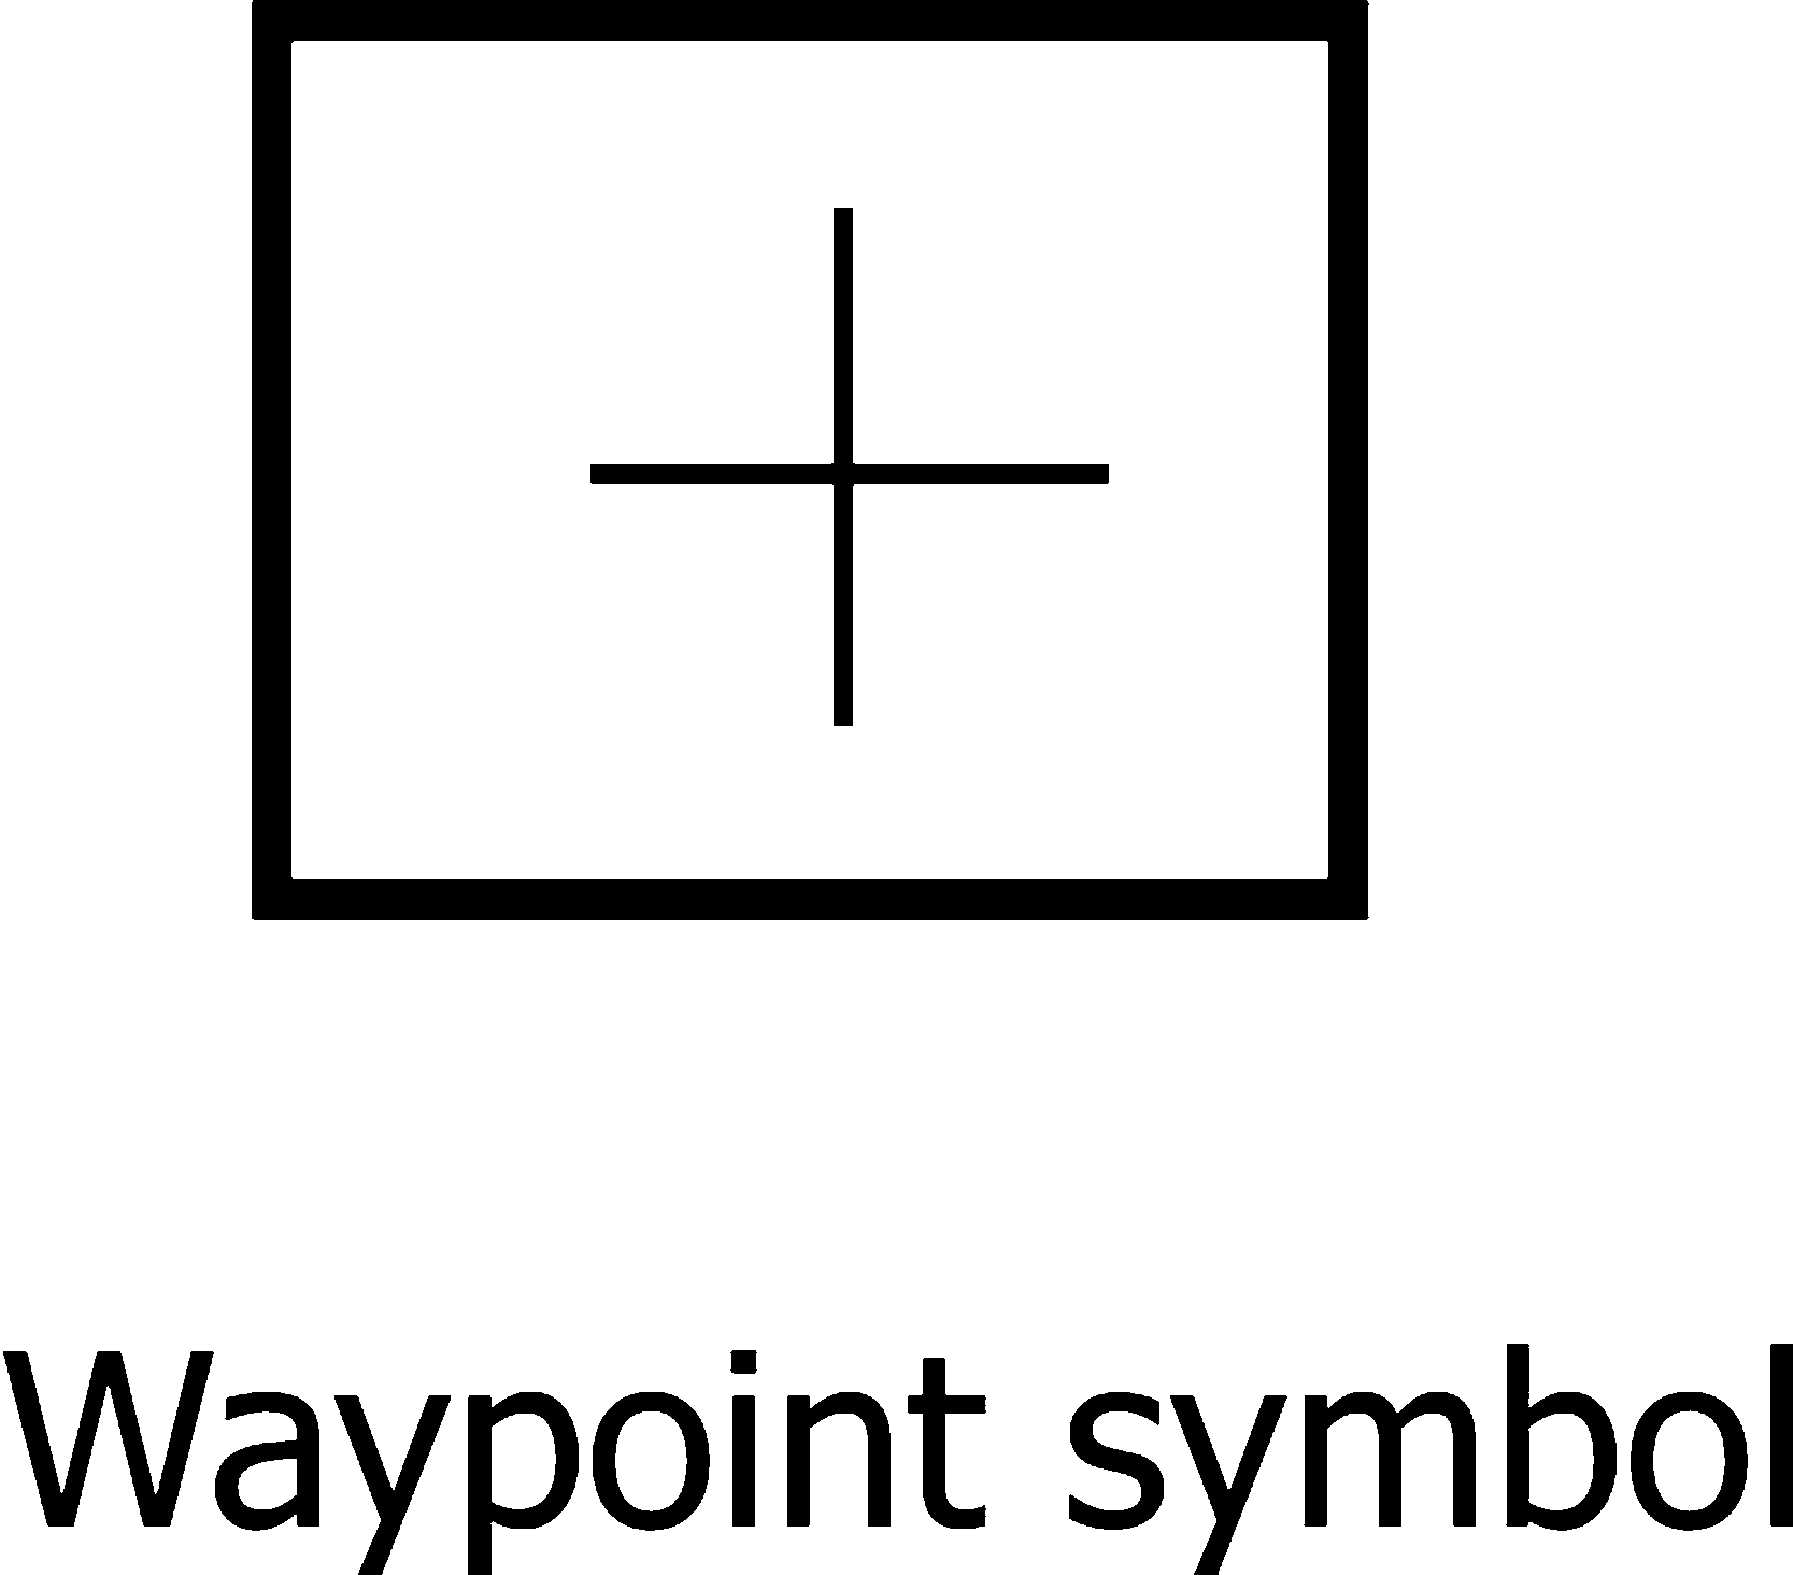
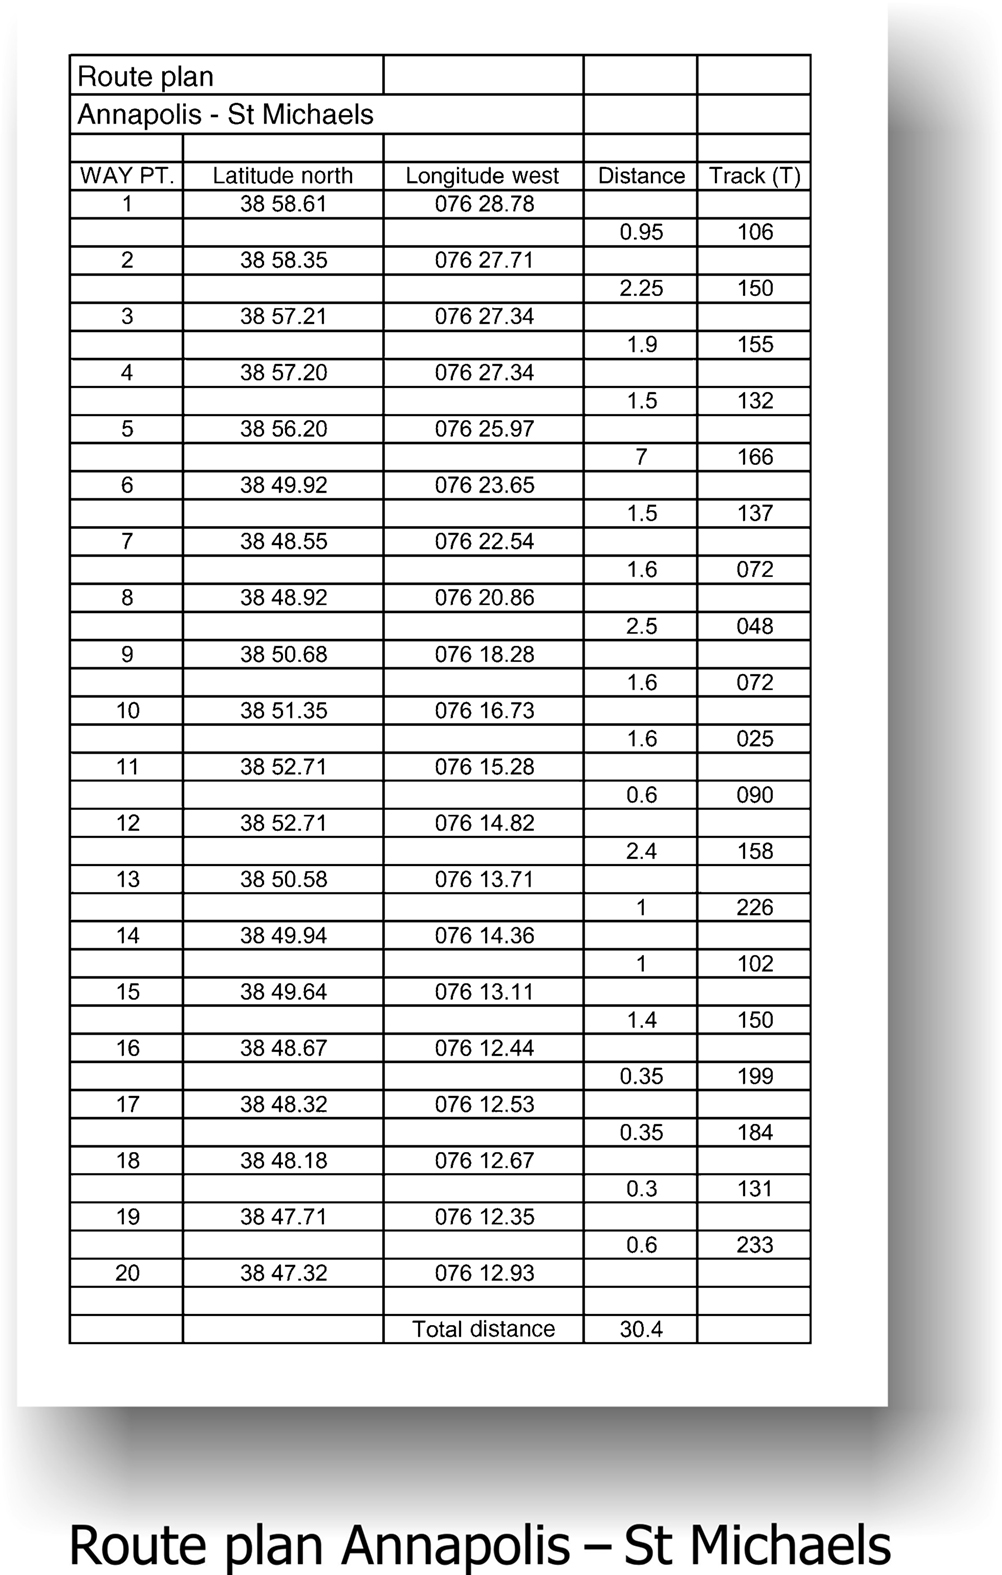
Once you have a safe route, mark the waypoints and determine their coordinates. There’s no standard symbol for a waypoint, as there are other navigation details, such as position. Many navigators, however, use a square with a cross in the middle.
Measure the distance and direction of each leg and note these down on a ‘plan’. It’s a good idea to use a printed ‘pro forma’ for this, or on the route-planning page of your navigation logbook. You will end up with something like this.
Note that I put the waypoints on every second line, so that the distance and tracks are on the intermediate lines separating each waypoint. This makes it easier to read than some other systems.
Loading the Route into the GPS
The first thing to remember is that ‘rubbish in 5 rubbish out’. We all know how easy it is to miss-key numbers using a keyboard. The only way of checking you have entered the route correctly is to check the route once it has been entered, and this is where the ‘tracks and distances’ table comes in.
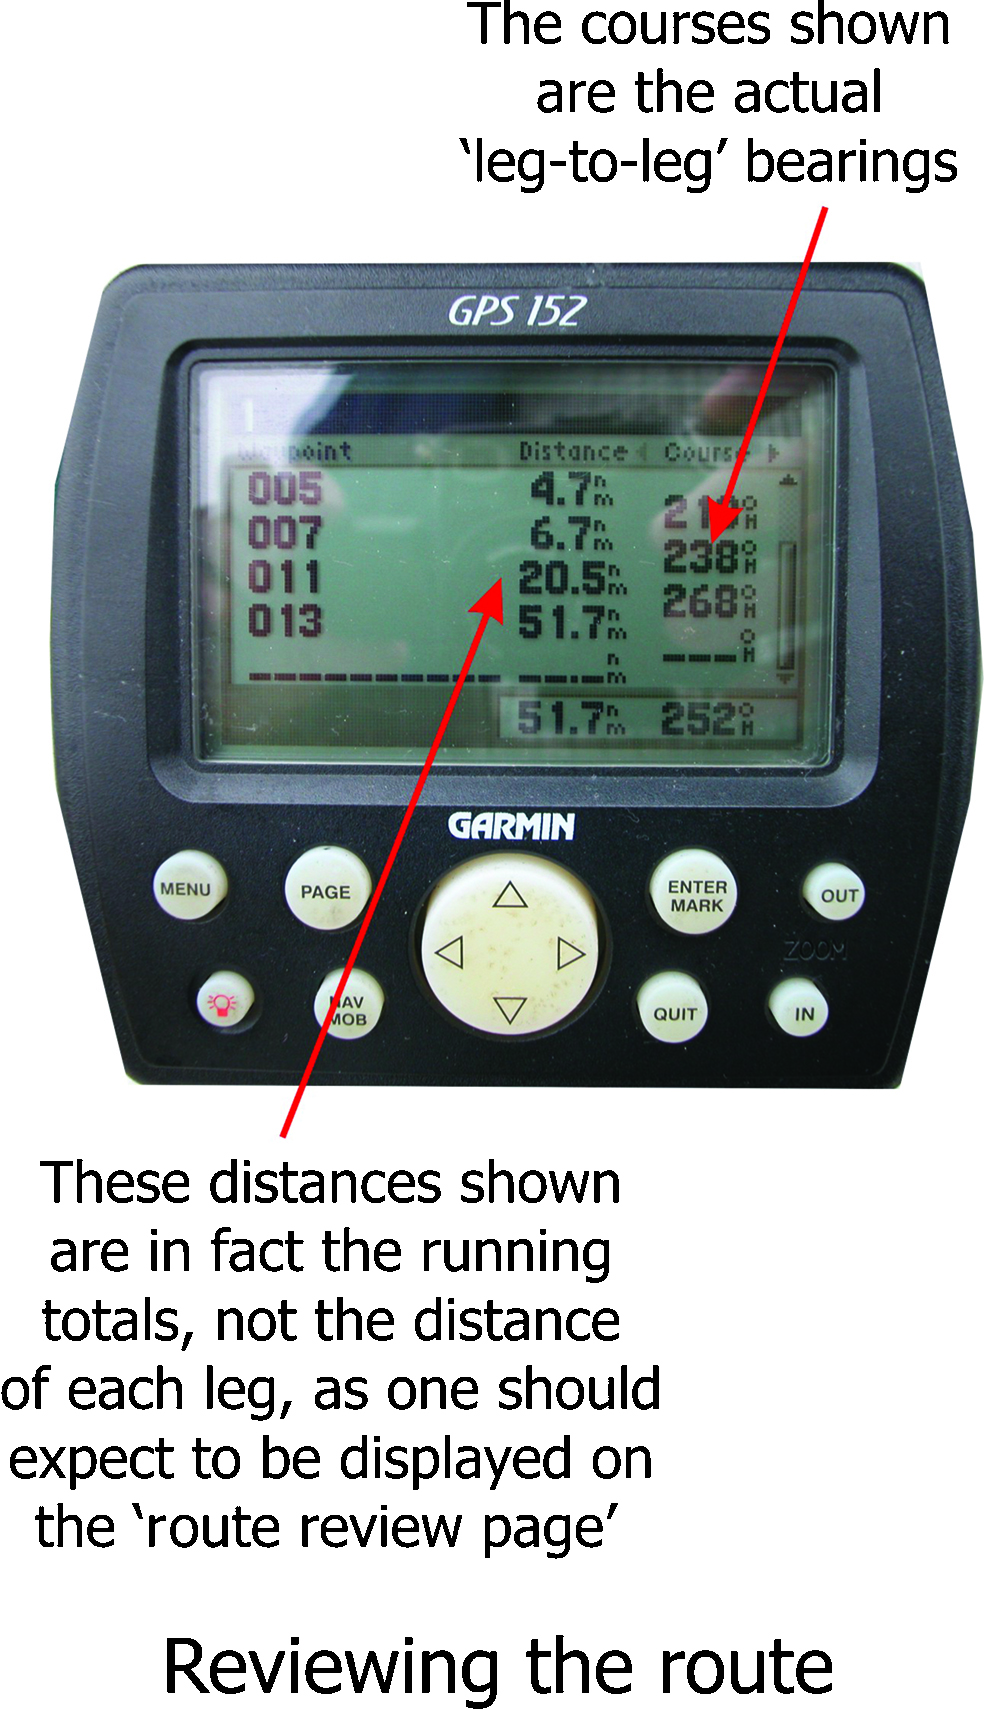
Once the route is loaded, go to the GPS display that shows the distances and tracks between each waypoint. Some early GPS sets didn’t allow this and were potentially dangerous. Check that the distances and tracks tally with your ‘paper’ plan. You may see a constant error in the tracks. This will probably be because you have measured ‘true’ directions on the chart, but have told the GPS to display bearings in ‘magnetic’, or vice versa. Any discrepancy must be investigated and usually it’s because a latitude or longitude has been miss-keyed, or misread from
the chart.
This procedure is mandatory if you wish to avoid potential disaster, but see the next paragraph.
Problems with Some GPS Receivers
When you try and review the route on some GPS receivers, you may find what appears to be a serious discrepancy in the leg distances. This is because the distances shown, on these sets, are not the leg distance but the running totals! This is unhelpful to the conscientious navigator, who is now required to carry out additional arithmetic to ensure that the route has been correctly entered.
Constructing a Route on an Electronic Chartplotter or PC
This is much simpler than the previous example, but potentially more dangerous because of the small size of the screen. This danger can be avoided by constructing the route on paper charts first and then transferring it to the chartplotter, or by meticulously zooming in and out and panning backwards and forwards on the plotter or PC screen, as you construct the route.
Taken from Practical Navigation for the Modern Boat Owner by Pat Manley.
© Not to be reproduced without written permission from Fernhurst Books Limited.